

Complete Guide: Automate WordPress Content Creation with n8n, Google Sheets & AI
Transform your content creation process with this powerful automation workflow! Learn how to build a sophisticated system that automatically generates SEO-optimized blog posts using n8n, Google Sheets, and Google Gemini AI. This tutorial will save you hours of manual work while maintaining high-quality content standards.
What You’ll Build: WordPress Content Automation System
This comprehensive guide will teach you how to create an automated WordPress content creation workflow that:
- Automatically retrieves content ideas from Google Sheets
- Performs AI-powered SEO keyword research
- Generates complete, optimized blog posts using Google Gemini
- Publishes content directly to WordPress
- Updates tracking status in your spreadsheet
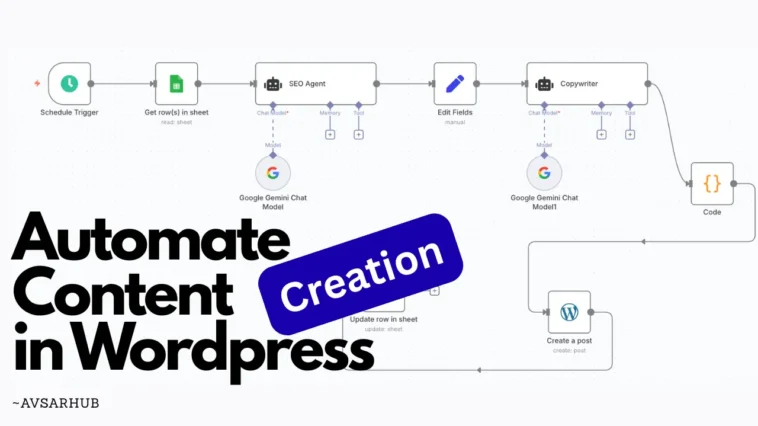
Workflow Architecture
Schedule Trigger → Google Sheets → SEO Research → Content Generation → WordPress Publishing
Prerequisites for n8n WordPress Automation
Before diving into this n8n automation tutorial, ensure you have:
- n8n instance – Cloud or self-hosted
- WordPress website with API access enabled
- Google Sheets document for content management
- Google Gemini API key for AI content generation
- Basic understanding of automation workflows
Step 1: Setting Up the Schedule Trigger Node
Configure Automated Content Publishing Schedule
The Schedule Trigger is the foundation of your automated content workflow. This node initiates the entire process at regular intervals.
- Node Type: n8n-nodes-base.scheduleTrigger
- Trigger Interval: Every 60 minutes
This configuration ensures your WordPress automation system checks for new content every 15 minutes, providing timely content publication without overwhelming your servers.
Step 2: Google Sheets Integration for Content Management
Retrieve Pending Content from Google Sheets
The Google Sheets integration acts as your content management system, storing article titles, descriptions, and publication status.
Copy this google sheet template: https://docs.google.com/spreadsheets/d/1wWJlqKCqRPbNpdA_7–VwqBKY4Pgv9t0uytqGiafGnY/edit?usp=sharing
- Title Column: Article headlines
- Description Column: Brief content descriptions
- Status Column: “Pending” or “Done”
- Row Number: Auto-generated tracking
The node filters for entries with “Pending” status and uses the returnFirstMatch option to process one article at a time, ensuring systematic content publication.
– lookupColumn: “Status”
– lookupValue: “Pending”
– returnFirstMatch: true
Step 3: AI-Powered SEO Research with Google Gemini
Automated Keyword Research and SEO Analysis
This is where the magic happens! The SEO Agent uses Google Gemini AI to perform comprehensive keyword research for each article topic.
- Primary Keywords: 3-5 high-volume, low-competition terms
- Long-tail Keywords: 10-15 specific phrases
- Related Keywords: 15-20 semantic variations
- Content Structure: H2/H3 heading suggestions
- Hashtag Research: 20-30 relevant social media tags
- Competitor Analysis: Content gap identification
The AI agent analyzes your target audience (MBA students, entrepreneurs, AI learners, business students) to provide contextually relevant keyword suggestions that improve your content marketing automation effectiveness.
Step 4: Data Processing and Field Management
Structuring Data for Content Generation
The Edit Fields node organizes and structures the data flow between SEO research and content creation phases.
description: {{ $(‘Get row(s) in sheet’).item.json.Description }}
keywords: {{ $json.output }}
This step ensures clean data transfer and proper variable mapping for the subsequent content generation process in your automated blogging system.
Step 5: AI Content Generation with Advanced Copywriting
Creating SEO-Optimized Blog Posts
The Copywriter agent uses the SEO research to generate comprehensive, engaging blog posts optimized for search engines and user experience.
- Word Count: 1800-2500 words
- Format: HTML with semantic structure
- SEO Density: 1-2% keyword optimization
- Structure: Introduction, body sections, conclusion
- Additional Elements: FAQ sections, meta tags, schema markup
This advanced AI content creation ensures every article meets professional publishing standards while incorporating your researched keywords naturally throughout the content.
Step 6: Content Formatting and HTML Processing
Optimizing Content for Web Publishing
The Code node performs crucial content cleaning and formatting to ensure proper display in WordPress.
const stringContent = String(content);const cleanContent = stringContent
.replace(/\\n{2,}/g, ‘<br>’)
.replace(/\n{2,}/g, ‘<br>’)
.replace(/\n\s*\n/g, ‘<br>’)
.replace(/^\s+|\s+$/g, ”)
.replace(/\n/g, ‘<br>’);
This processing step converts line breaks to HTML breaks, removes excessive whitespace, and ensures your automated content displays correctly in WordPress, maintaining the professional appearance of your automated blog posts.
Step 7: WordPress Publishing and Integration
Automated Content Publishing
The WordPress node handles the final step of publishing your AI-generated content directly to your website.
- Title Source: {{ $(‘Edit Fields’).item.json.title }}
- Content Source: {{ $json.cleanContent }}
- API Authentication: WordPress REST API credentials
- Post Status: Published (configurable)
Your WordPress automation ensures seamless content delivery while maintaining your site’s posting schedule and quality standards.
Step 8: Status Tracking and Workflow Completion
Updating Content Management System
The final Update row in sheet node marks processed content as “Done” to prevent duplicate publishing and maintain organized content tracking.
Status: “Done”
This ensures your content automation workflow remains organized and prevents the same article from being processed multiple times.
Advanced Configuration Tips for n8n WordPress Automation
Optimizing Your Automated Content System
- Error Handling: Add try-catch blocks for API failures
- Content Validation: Implement quality checks before publishing
- Scheduling Options: Adjust trigger frequency based on your needs
- Multi-site Support: Configure for multiple WordPress installations
- Content Categories: Add automatic category assignment
- Featured Images: Integrate image generation or selection
Key Takeaways: Mastering WordPress Content Automation
- Scalability: This workflow can handle unlimited content creation with minimal manual intervention
- SEO Optimization: Automated keyword research ensures every post is search-engine friendly
- Quality Control: AI-powered content generation maintains professional writing standards
- Time Efficiency: Reduces content creation time from hours to minutes
- Consistency: Ensures regular, scheduled content publication
- Integration Flexibility: Easily adaptable for different content management needs
Troubleshooting Common Issues
Resolving n8n WordPress Automation Challenges
Verify your OAuth2 credentials and ensure the spreadsheet is shared with the appropriate Google service account. Check that column names match exactly as configured in the workflow.
Ensure your WordPress site has the REST API enabled and your application password or API key has sufficient permissions for post creation and management.
Absolutely! Modify the prompts in both the SEO Agent and Copywriter nodes to match your specific content style, target audience, or industry requirements.
Add additional WordPress nodes with different credentials, or implement conditional logic to route content to different sites based on categories or tags in your Google Sheet.
Google Gemini has usage quotas, and WordPress REST API has request limits. Monitor your usage and implement appropriate delays or caching strategies to stay within limits.